

Operating Procedure: RaxisIV++/Xenocs Multilayer System
DO NOT USE THIS DOCUMENT - THIS REFERS TO THE PRIOR RUH3R/XENOCS/RAXIS IV++ SYSTEM THAT HAS BEEN SUPERCEDED BY THE NEW MICROMAX 007HF/VARIMAX/PILATUS SYSTEMCurrent version of the SOP document for MicroMax 007HF: SOP1.html.
Safety
 |
The X-ray generator is usually either turned off (no anode rotation) or left making X-rays at lowest power (20 kV/10 mA = 200 W). If either of the red X-RAY ON lights are lit on either the front panel or on the tower of warning lights, the generator is making X-rays. Be extremely careful. X-rays will not escape the anode tower unless the shutter opens, however, and the shutter will not open if the hutch door is open and the interlocks are engaged. So if you are working in the hutch, leave the door open and the shutter cannot open. Conversely you'll need to close the door once you leave the hutch, in order to take images. |
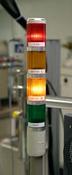 |
If the yellow SHUTTER OPEN light is lit on the warning light stand, then the shutter is open X-rays are hitting the crystal - do not enter the hutch. There's also a small red light on top of the x-ray shutter assembly but this is unobtrusive - the shutter is also open when this is lit. The safety mechanisms are arranged such that if the bulbs are blown, the features will not work (X-rays will not be generated or shutter will not open). These features are tested every 6 months. The system is surveyed for background scatter at least annually - the bottom line is that outside of the hutch the scatter is minimal and indistinguishable from background. |
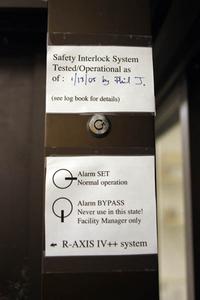 |
Each machine has an experimental hutch with a safety interlock associated with it. The X-ray shutter will not open if any of the hutch doors are open. Before you start working with the machine, make sure the safety interlocks are not overridden. Check that the appropriate override lock is set to ENABLE the interlocks and that the keys are not in the lock. Never operate the machine if the interlocks are bypassed or if there are keys in the override lock. Always leave the hutch door open when you are inside the hutch - this will prevent any possible opening of the X-ray shutter by mistake. The interlocks are tested every 6 months. This is noted in the log book. |
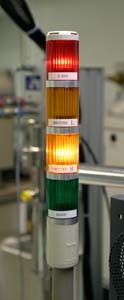 |
On the warning light tower, the top red light indicates X-RAYS ON - the generator is making x-rays. The middle two yellow lights indicate SHUTTER OPEN (we only use the right port, so the left shutter is never open) - i.e. x-rays are hitting your sample when the lights are lit. The bottom (green) lamp is READY, which is lit only when the anode is spinning and the x-rays are off - you'll rarely see this lit. In the photo the X-rays are on and the shutter is open - this is a warning that you should stay way from the X-ray optics and out of the hutch. |
Also, the software is often rather unobtrusive while it is working, so you need to double check that the software is truly "idle" before attempting to mount your crystal. Leaving the hutch door open whenever you are working in there, and closing it only after you've left the hutch, is a good failsafe method in case the computer still thinks it is controlling the machine.
Which Machine am I using ?
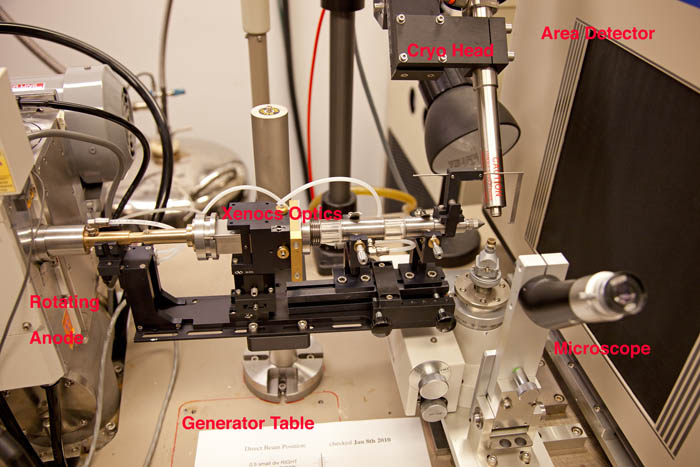
You're using the Raxis IV++ system - we've decommissioned the older Raxis IIc system. This system has been upgraded with new optics, so the SOP has changed slightly.Before You Start
One or two of the pictures on here are out of date and show the older Rigaku Yale mirror box rather than the newer (much) brighter Xenocs Fox 2D 25-25P multilayer optics. The rest of these pictures have been updated along with the text to reflect the new setup.- Vacuum for optics
- X-ray generator settings
- Oxford cryo settings
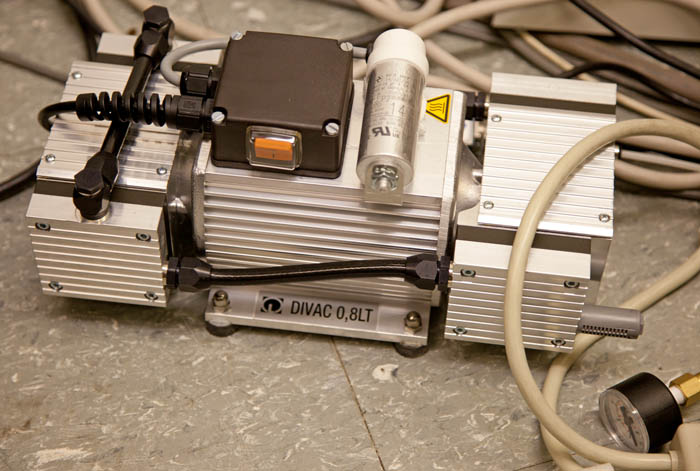
| The optics no longer require helium, but DO require a small vacuum pump to be running. There's a small silver-and-black vacuum pump on the floor of the enclosure to the rear right of the generator and near the smaller cryo dewar. It should be on, will be moderately hot, and you should check the manometer reading. It should be all the way counterclockwise, i.e. <30 mmHg. The manometer is at the lower right of this image. |
|
|
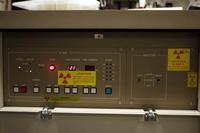
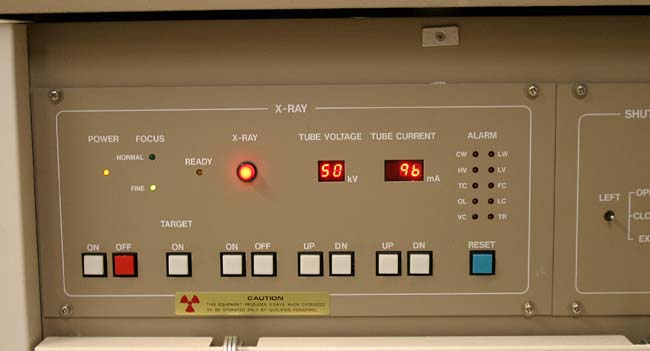
Check that the generator is running. On the warning light stand, the
red X-RAY ON light should be lit. On the front panel it should
read Tube Voltage 20 KV and Tube Current 10 mA (unless someone has left the
machine at full power - in the photo it's almost at full power).
Note also the X-RAY ON light on this front panel photo:
If the generator power is at 20 kV and 10 mA, bring the generator slowly up to full power at 50 kV and 100 mA. Increase by 2 kV and 4 mA at a time, once every 5-10 seconds. Check the vacuum gauge on the extreme far right of the front of the generator (next to the Helium flow manifold) to make sure that it doesn't spike while you do that, although it should drift up as you increase power. |
|
| If any ALARM condition LEDs are lit, this is helful in diagnosing the error (TC and OL lights indicate instabilities in the generation of x-rays - normally the generator can just be restarted; VC means there's an issue with the vacuum system; FC means the filament has blown; CW means there's an issue with the cooling water). If you are going to call Phil to report an error, please make sure you know what this error state is. | 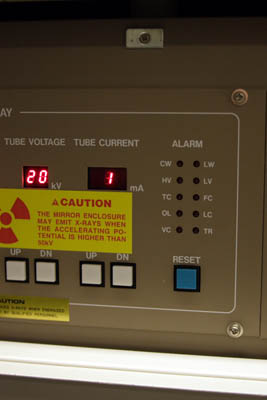 |
| Now check that there is enough liquid nitrogen in the cryo dewar to run the cryo system. On the table outside the hutch, the control box/level meter reads how much lN2 there is in the small dewar. Never operate the cryo system if the lN2 level is below 5 and do not leave it operating below 6. If it is low, fill the small dewar (inside the hutch) from the large one (outside the hutch) by flipping the toggle switch to OPEN on the control box. Do not leave a filling dewar unattended. Do not fill the small dewar beyond 15 (inches). Recently I've changed the fill mode to AUTO, which automatically fills the small dewar from the large one when the level gets too low. Nevertheless you should always check the reading on the level controller, and make sure there is enough lN2 in the large dewar. | |
Now start the cryo unit. This takes about 90 minutes to come down to
operating temperature from room temperature.
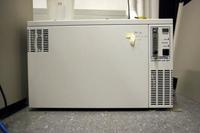
Turn on the cryo dry air generator (see photo)
that sits at the far end of the enclosure.
Then turn on the cryo controller box (power switch at the rear right).
Wait for it to self-check. Then press the PROGRAM button.
Using the arrow keys and the ENTER button, program the cryo to
RAMP at 120 K/hr down to 100 K.
Then on the next line put a HOLD entry at 100 K
(do not press the HOLD button !!). Then on the 3rd line put
an END entry at 129 K/hr to 293 K. This sets up the entire cycle
of the experiment
including the shut-down procedure:
RAMP 120 100
HOLD 100
END  120 293
Once you've programmed it press the START button and the cryo should slowly ramp down to operating temperature. Because of the algorithm, it rarely stays locked at precisely 100K but tends to wander a few K around this point. That's not a problem. Once you've finished with the cryo unit, pressing the START button again will send it to the END statement and it will do a controlled shutdown. |
 |
If the cryo unit cannot reach your target temperature (100K) during the RAMP phase it will not progress to the HOLD phase. This usually happens if the vacuum is starting to fail on the cryo head. You can still use the unit as long as it is capable of maintaining <110K, but in order to move to the next phase (for shutdown) you'll need to press the HOLD button to force the end of the ramp (it will try and maintain the current temperature), and then press the START button to initiate the END sequence including ramp up to 293K and shutdown.
If the temperature is varying more than 0.5 K around the target temperature after 2 hours of you starting the machine, you probably have to do the EvapT fix. This involves changing the default setting of EvapT. Instructions are given in this link.
If both X-ray generator and Oxford cryostream are working OK, then you can proceed.
Mounting a crystal
- Treat the hardware nicely !!
- Mount an empty loop and check for alignment
- Mount a crystal and align it
| Unlock the phi axis via the Locked/Free dial. It's locked when the word "LOCK" is on the right of the dial, and unlocked when "FREE" is there instead. What this does is engage/disengage the phi motor from the phi axis spindle from the. You need to lock the phi axis before collecting data otherwise the computer has no way to control the crystal. If the control software shows an error during the initialization phase this is the first thing to check - it's a very commonly made mistake. However make sure you stop the software before locking down the phi axis - trying to lock it down while the motor is spinning may strip the threads. (Note: this is an older image with the Yale mirror box in place, the phi lock is the same but the white box at top left is no longer there and there is no Helium tube). | 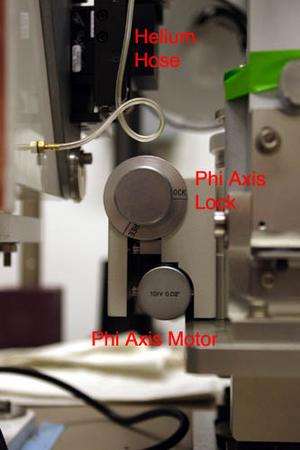 |
|
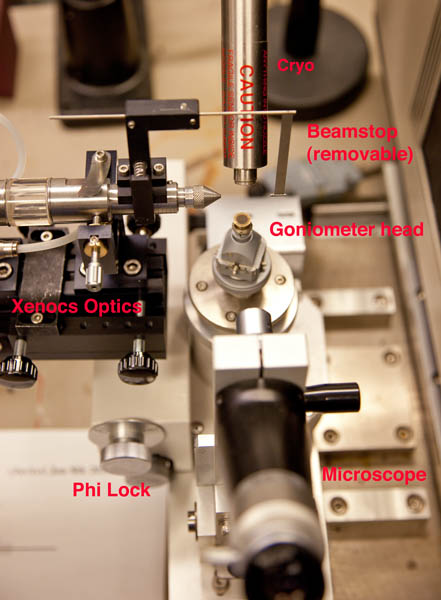
Find a goniometer head (of Supper or Huber design, according to your
preference) and mount it on the phi axis. Make sure it's tight enough so
that the head does not waggle on the axis. Often a goniometer head will
already be in place. Put an empty loop on the head and align it in the
microscope. Because the cold stream is set at an angle to the phi axis,
the goniometer head does not freeze. Therefore you can align the
loop/crystal at your leisure. Unlock the phi axis if it is locked down
(the small black grub screw on the phi axis body). Translate the goniometer
head vertically via the thinner gnurled ring around the phi axis. Translate
the loop/crystal via the sleds on the goniometer head. The center is
always the point which the loop/pin/crystal precesses around so it's
actually easy to center - spin the loop back and forth through 180 degrees,
and move the translations (the ones that move the xtal left/right in the
microscope - the ones perpendicular to your viewpoint) until it spins around
it's own center. Then do the same thing after rotating the loop 90 degrees.
Note that you should only change the sled that moves the loop left/right across the microscope view direction - changing the other sled (along the viewing direction) just moves the loop along the viewpoint and you won't be able to tell the center reliably - the xtal will just go in and out of focus. |
|
Visually check that the cold stream nozzle is centered on the loop when the loop is centered in the microscope. If it's not you'll have to get Phil to recenter it for you. But you can adjust the up/down position of the cryo head (i.e. it's distance from your crystal) via the large black knob at the rear of the cryo head slide. Generally speaking the closer the nozzle is to the crystal the better, although you'll want it at least 7mm away from the crystal to avoid it clipping the X-ray beam. The beamstop on the new Xenocs optics system is removable by the user (it clips to the collimator) if you want a little more clearance to mount the crystal but remember to replace it.
With the loop approximately centered, you're ready to mount the crystal. Simply remove the empty loop and mount your crystal. Center the crystal as indicated above. Lock down the phi axis using the LOCK/FREE dial and optionally the phi axis translation screw after everything is centered using the Locked/Free dial and then you're ready to take some images. Check that the right hand shutter switch (SHUTTER panel on front of generator) is down at the EXT setting (EXTernal control). Exit the hutch and close the door.
Controlling the RaxisIV++ with the Software
Crystal Clear is the software that controls the computer. It's one of Rigaku/MSC's less-than-perfect implementations.On the Pentium 3 computer (now with flat screen!) there is a CrystalClear icon on the Desktop (top left corner unless someone moves it. Double click on it and start the software. It will ask you for a username (pli) and a password (check the log book on p.30 for the current one).
The software has the idea of a Project and a Sample. For the Project you can use your name or the name of your protein. If you've not used the machine before, select New Project from the File menu. If you have used the machine before and have an existing project name you can use New Sample to create a new sample directory for your experiment. You don't actually have to use a new sample for each crystal, since you can just change the filenames at the data collection stage.
Once you have selected your Project and Sample, you can select what you want to do. I never mess around with the other procedures - I just click on the Collect Data button. A few protocols exist: 0 degrees (one frame), 0/90 degrees (two frames), 0/90/180/270 (four frames), and "custom". You'd use the latter for general data collection. I use 0/90 for crystal screening.