

Operating Procedure: MicroMax 007HF/Varimax HF/Pilatus 300K Single Crystal X-ray System
This document refers to the current hardware - the MicroMax 007HF generator. Previous version of this document for RuH3R: SOP1_RuH3R.html.Safety
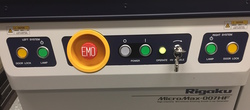 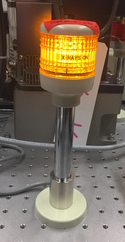 |
The X-ray generator is usually left with the anode spinning and generating X-rays at lowest power (20 kV/10 mA = 200 Watts). If the orange X-RAY ON light on the table top is lit, the generator is making X-rays. Be extremely careful. X-rays will not escape the anode tower unless the shutter opens, however, and the shutter will not open if the enclosure door is open and the interlocks are engaged. So if you are working in the enclosure, just leave the door open and the shutter cannot open. Conversely you'll need to close the door once you leave the enclosure, in order to take images. The EMO (Emergency Machine Off) red button on the front panel will abruptly shut down the system in times of emergency. Use the XGControl software if you want to turn X-rays off or change power. Unlike the previous system (RuH3R) there's a lot less information on the front panel of the generator - most of the generator control and information is via the XGControl software on the control computer. |
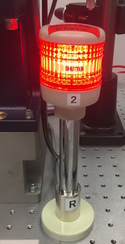 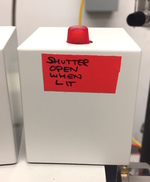 | If either of the red SHUTTER OPEN warning lights are lit, then the shutter is open X-rays are hitting the crystal - do not enter the enclosure. The larger shutter open lamp at top is on the experimental table. The smaller shutter open lamp is on top of the shutter assembly. The safety mechanisms are arranged such that if the bulbs fail, the features will not work (X-rays will not be generated or shutter will not open). Failures should be rare since these are LED bulbs - use the XGControl software to toggle the shutter to test their functional state before entering the enclosure and starting your experiment. Enclosure interlocks and lamps are tested every 6 months. The system is surveyed for background scatter at least annually by EHS - the bottom line is that outside of the enclosure the scatter is minimal and indistinguishable from background. |
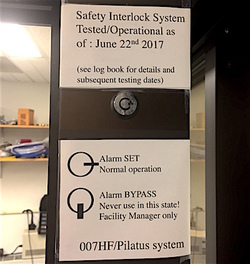 |
The generator/detector system has an experimental enclosure with a safety interlock associated with it. The X-ray shutter will not open if any of the enclosure doors are open. Before you start working with the machine, make sure the safety interlocks are not overridden. Check that the appropriate override lock is set to ENABLE the interlocks and that the keys are not in the lock. Never operate the machine if the interlocks are bypassed or if there are keys in the override lock. Always leave the enclosure door open when you are inside the enclosure - this will prevent any possible opening of the X-ray shutter by mistake. The interlocks are tested every 6 months. This is noted in the log book. |
Also, the software is often rather unobtrusive while it is working, so you need to double check that the software is truly "idle" before attempting to mount your crystal. Leaving the enclosure door open whenever you are working in there, and closing it only after you've left the enclosure, is a good failsafe method in case the computer still thinks it is controlling the machine.
Which Machine am I using ?
There's only one machine ! It has been a long while since we had the old Raxis II system, and we've replaced the Raxis IV++ system with a newer one that is 50x more powerful than the RaxisIV++ system. The hardware is:- Rigaku MicroMax 007HF X-ray generator (1.2 kW @ 40kV, 30mA)
- Varimax HF Arc)Sec multilayer optics for CuKα radiation. Beam is 189µm FWHM. Collimation is usually 200µm, sometimes 300µm.
- AFC11 partial-Χ goniostat
- Dectris Pilatus3 R 300K pixel array detector
- Oxford Cryosystems Cryostream 700 cryostat
Before You Start
- Nitrogen gas for detector
- Vacuum for optics
- X-ray generator settings
- Oxford cryo settings
|
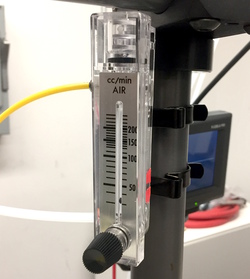
The detector requires nitrogen gas constant flow to suppress humidity. It will flat out stop working if there is no N2 flow. The flow guage is attached to the cryostream support stand - normal ops are at 30 cc/min and should never exceed 50 cc/min. The N2 regulator will be either on a N2 gas cylinder or usually attached to the lN2 high pressure dewar - both of them opposite the crystallization robot. Do not operate the machine without a flow of nitrogen gas. Use the "thread" command in the camserver window of the framegrabber to check humidity - <20% is desired. |
| The optics no longer require helium, but do require a small vacuum pump to be running, which is contained under the experimental table. You don't need to check pressure or the status of this pump but be aware than any loose tubes will compromise the optic - alert the facility manager. There's a vacuum guage for the optics mounted on the rear of the experimental table. | |
|
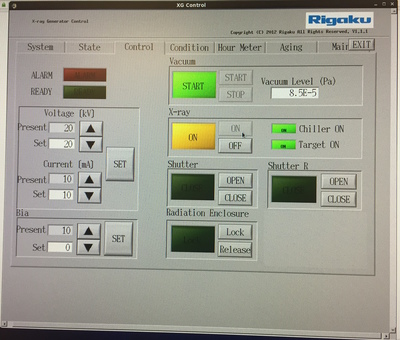
Check that the generator is running. The orange X-RAY
ON light should be lit (see above). In the XGControl software it
should read either the idle value (20kV 10mA) or full power (40kV
30mA) or just conceivably the X-rays will be off. If the X-rays are
off press XRAY ON button on XGControl (middle of panel) - you should
see that, in sequence, the Chiller ON should light up, then Target ON,
then finally X-RAY ON. It will take about a minute to do all of that.
You can then change to full power within XGControl itself using the
"SET" values underneath the actual operating values ("Present") in
XGControl. Idle is 20 kV, 10 mA and full power is 40 kV 30 mA. Move
slowly - 5 mA/30 sec - between idle and full power.
If the ALARM condition is lit in XGControl, talk to the facility manager before doing anything else. Often some sort of cryptic error is reported in the MAINT tab of XGControl. We're persistently getting a WX5201 Warning at the moment - this appears to be a spurious arc warning. |
| Now check that there is enough liquid nitrogen in the cryo dewar to run the cryo system. On the table outside the enclosure, the control box/level meter reads how much lN2 there is in the small dewar. Never operate the cryo system if the lN2 level is below 5 and do not leave it operating below 6. If it is low, fill the small dewar (inside the enclosure) from the large one (outside the enclosure) by flipping the toggle switch to OPEN on the control box. Do not leave a filling dewar unattended. Do not fill the small dewar beyond 15 (inches). Recently I've changed the fill mode to AUTO, which automatically fills the small dewar from the large one when the level gets too low. Nevertheless you should always check the reading on the level controller, and make sure there is enough lN2 in the large dewar. | |
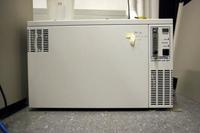 |
Now start the cryo unit. This takes only 20 minutes to come down to operating temperature from room temperature. Turn on the cryo AD51 dry air generator (see photo) that sits at the far end of the enclosure. Then turn on the cryo controller box (power switch at the rear right). Wait for it to self-check. If it's already turned on and shows SHUTDOWN then press the "start" button instead. On restart the controller will default to a COOL operation where it rapid-cools to 100K using Turbo mode on the gas pump. When it reaches 100K it will HOLD at the target temperature unti you program it to do something else. |
If the cryo unit cannot reach your target temperature (100K) during the COOL phase it will not progress to the HOLD phase. This usually happens if the vacuum is starting to fail on the cryo head. You can still use the unit as long as it is capable of maintaining <110K, but in order to move to the next phase (for shutdown) you'll need to press the HOLD button to force the end of the ramp (it will try and maintain the current temperature)
If both X-ray generator and Oxford cryostream are working OK, then you can proceed.
Mounting a crystal
Running under Windows you'll be using CrysAlisPro. Running under Linux you'll be using HKL3000R - I'm going to assume the latter here.- Treat the hardware nicely !!
- Mount an empty loop and check for alignment
- Mount a crystal and align it
Start HKL3000R
In the COLLECT tab press the connect button, which will talk to the goniostat and initialize it. In COLLECT's ALIGN tab press the CRYSTAL MOUNT button which moves the goniostat to a position where you can efficiently mount the crystal. Note position of microscope.The four circle goniometer
In contrast to the old RAXIS IV++ single-axis goniostat our new one has 4 axes: the detector swings on 2θ and has a motorized distance track; during data collection the crystal rotates about the vertical ω axis; the partial χ axis can move between 0° and 45° the φ axis moves up and down the χ axis and rotates about the spindle. In combination this gives quite a lot of flexibility in crystal orientation. For mounting the crystal you want ω=0, χ=0; φ=0; 2θ=-20 and d=100. Note that 2θ is negative as it moves away from you - its range is +5 to -90°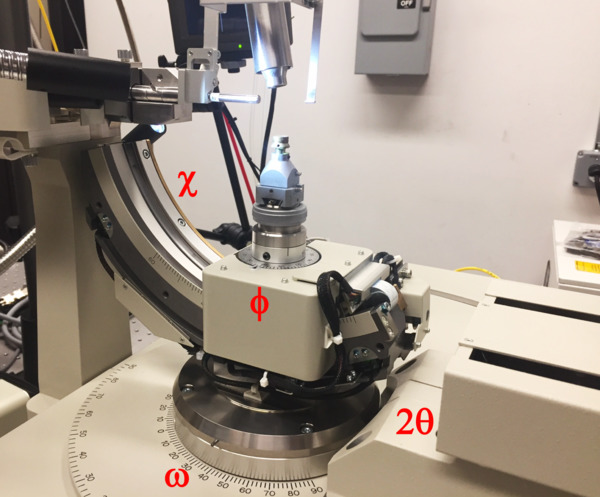
Mount a test loop and then your crystal
In HKL3000R, move the goniostat to the mount position via COLLECT>ALIGN>CRYSTAL MOUNT. (Despite the video on that screen you still need to mount and align the crystal on the goniostat itself).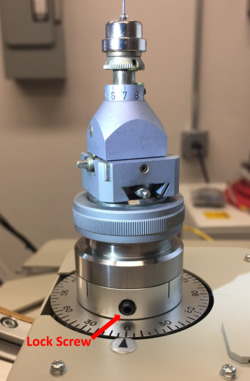 |
Unlock the phi (φ) axis via small black lock screw, using a hex
wrench. This uncouples the goniometer head from the phi axis
motor. Mount the crystal and align using the camera cross hairs.
Bear in mind that the camera is in the same plane as the collimator
but offset about 35° from it. To have much chance of centering
you should rotate phi so that one of the goniometer sleds is
perpendicular to the camera axis. Adjust to center the crystal,
rotate 90° and repeat. Do it a few more times and you should be
set. Adjust vertical translation via the key on the goniometer
itself. Then lock the phi axis again with the black grub screw, or
your crystal won't move during data collection. The other axes
(ω χ 2θ) are all motorized and can only be moved via
HKL3000R or CrysAlisPro. Re-locking this lock screw is the thing you're most likely to forget and it'll mess up your data collection. |
Visually check that the cold stream nozzle is centered on the loop when the loop is centered in the microscope. If it's not you'll have to get Phil to recenter it for you. But you can adjust the up/down position of the cryo head (i.e. it's distance from your crystal) via the large black knob at the rear of the cryo head slide. Generally speaking the closer the nozzle is to the crystal the better, although you'll want it at least 7mm away from the crystal to avoid it clipping the X-ray beam. The beamstop on the Varimax optics system is removable by the user (it clips to the collimator) if you want a little more clearance to mount the crystal but remember to replace it. Because we allow close approach by the detector make sure you slide it to the left on the collimator. You will permanently damage the detector if you collect more than one image without the beamstop being in place.
With the loop approximately centered, you're ready to mount the crystal. Simply remove the empty loop and mount your crystal. Center the crystal as indicated above. Lock down the phi axis using the LOCK/FREE dial and optionally the phi axis translation screw after everything is centered using the Locked/Free dial and then you're ready to take some images. Check that the right hand shutter switch (SHUTTER panel on front of generator) is down at the EXT setting (EXTernal control). Exit the enclosure and close the door.
Controlling the System with the Software
The control computer runs both Windows 7 and Linux (CentOS) but you need to reboot to get from one to the other and they don't "see" each other's systems. Generator controls (X-ray on/off, idle power @ 20kV/10mA, full power @ 40kV/30mA) are via the XGControl program that you can find on both Linux and Windows. Goniostat control is via the HKL3000 and CrysAlisPro control programs.If you've booted into Linux the software that controls the computer is HKL3000 - basically the same software that we previously used. If you're running Windows the program is CrysAlisPro and is a completely different piece of software. Use HKL3000R for protein data collection and CrysAlisPro in SM mode for small molecule. CrysAlisPro has a PX mode for collecting protein data but we rarely use it for that.
- For an outline of HKL3000R operations use this document
- ADD CRYSALIS PRO LINK - not written yet.